Howdy folks, it's your wee pal Alex, back for more fun!
Here at Voquent, we generally do the audio editing in-house, and the voice actors who record projects with us will send their audio completely raw, with no processing whatsoever.
For us, this means we can do the edit from a clean start, and we're not wasting time fixing someone else's terrible—if well-intentioned—edits. However, there are a few tricks and principles voice actors can bear in mind to make life easier for the audio engineer and anyone else involved in the voice-over post-production work.
1. DO NOT 'OVER-PROCESS' with EQ or other effects
Avoid this and the audio engineer will always be eager to work with you.
EQ (short for 'equalizer') is something that changes the tonal quality of audio. It works through complex phase algorithms that highlight or reduce specific frequencies. This can be used, for example, to remove low-end rumble or add some 'air' in the high frequencies and make it sound crisper.
Frequency is measured in hertz, so knowing which frequency to edit to achieve your desired result is vital. I will say it only once. If you are inexperienced using EQ, don't use it! Any audio engineer would always rather have something with a little bit of rumble or a little bit too much sibilance than something that has had too much removed. It's much harder to add it back in once it's removed!
Also: NEVER BOOST FREQUENCIES WITH EQ.
A dubbing mixer may occasionally boost certain frequencies where it works to make a voice cut through sound effects or music or to improve the overall tone, but they do this gently.
Unless you are mixing something for a final broadcast, do not boost anything. This is because you won't know if it will interfere with some other sounds that are yet to be added, such as music or sound effects. Professional noise reduction plug-ins can also introduce more noise and digital artefacts. It is best to avoid using them too frequently, or else an engineer can't fix them.
Remember – somebody else can't add in what you've already taken out, but they can usually take out what you've left in!
2. USE VOLUME AUTOMATION to adjust relative levels, rather than compression
Similar to EQ, expertly using a compressor takes practice. It’s tricky to get right.
A compressor is a tool that automatically reduces the relative loudness (determined by the 'ratio' of the compressor) of peaks that are higher than a certain threshold measured in decibels.
You may have seen the word “automatic” in the previous sentence and thought “, why would I not use that? It'll save so much time!” but there is some skill involved.
Compressors work across all frequencies simultaneously.
You may have a sibilant (an 'ess'), i.e. a higher decibel level than the rest, but it is not perceived as louder because of the different frequencies making up the sound. It will be compressed regardless of the perceived loudness.
Yes, there is a difference between perceived loudness and absolute loudness (amplitude). Use volume automation to adjust the level of specific sounds that sound like they are too loud. Like plosives such as 'P', certain syllables will not be loud enough to hit the compressor but will have a noticeable 'pop'. I will explain how to edit plosives later, but the general principle of using volume automation to adjust the levels of loud sounds manually is a valuable rule to follow.
Suppose your audio software doesn't have volume automation, like Audacity or other low-end DAWs. In that case, there is still a way to follow this procedure and manually edit the levels. What you need to do is select or 'cut' the bit of audio (for example, an 'S') and then go through whichever process your DAW requires you to do to reduce the level or gain. Then, and this is vital, you need to crossfade the audio with the reduced volume with the rest of the audio around it.
See tip #5 for more information on fades and crossfades.
3. MANUALLY REDUCE BREATHS don’t remove them completely
Similar to the previous point about using volume automation, but this time concerning specifically reducing breath sounds.
Companies such as Izotope make plug-ins to reduce breaths based on a certain threshold automatically. It works similarly to a noise gate, often built into a compressor as a separate set of adjustable parameters. However, the same arguments apply as with compression. Relying on a plug-in to do it automatically can miss some breaths, accidentally cut out ‘breathy’ syllables and words (such as ‘H’ sounds) and not reduce breaths that are technically quiet but have some other unpleasantness about them (clicky etc.).
The other important thing to remember is not to remove the breath altogether. Just reduce the levels.
Having silence in between speech sounds very unnatural, which leads to my next point.
ALSO READ: Alex’s top tips to get more voice-over jobs with Voquent
4. MASK SOUNDS YOU REMOVE WITH ROOM TONE, from elsewhere in the recording
No matter how good your setup is, every recording will have some background noise.
It’s unavoidable! Whether it’s the gentle sound of the air in the room or the squeaking of the full latex suit you are wearing whilst you record, there will always be something. If you must remove sounds, such as mic bumps, coughs, mistakes, etc., you need to cover up these sounds with something else.
 See the difference in the waveforms between room tone (left) and true silence (right)?
The thing about the natural world is that it is never actually silent.
Having audio that jumps from talking (with the inevitable background noise (however low it may be)) to silence (sometimes only for a fraction of a second) will sound very unnatural.
5. USE FADE-INS AND FADE-OUTS on all edits
Fades are vitally important but frequently missed by amateur editors.
In the same way that complete silence is unnatural, a sudden “cliff-edge” reduction in volume, or a sudden increase, sounds alien to the human ear.
There are slight differences in fading in and out depending on what edit you've made. It's easier to demonstrate with screenshots, so here goes.
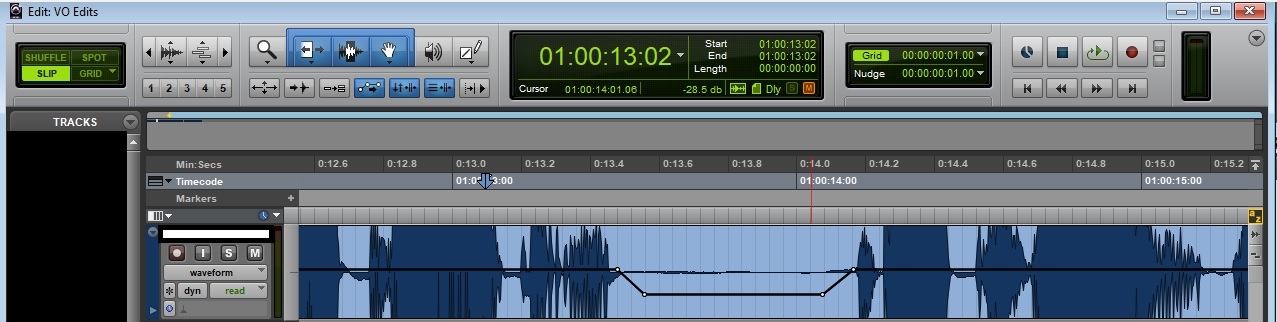
The black line represents the volume of each clip and shows a gentle fade-in and fade-out.
As you can see in the above image, the black line representing the volume of each clip dips slightly is there to reduce some background noise and breaths.
This screenshot is from Pro-Tools, and the way it looks here is specific to how Pro-Tools works—displaying the clip-gain line is very useful, Pro-Tools users!.
However, the principle is well exemplified here, showing a gentle slope into and out of the fade—vital to ensure there is no little 'pop' noise whenever you reduce the volume too quickly.
It is much more natural-sounding to make something' fade' to get a bit quieter. As I mentioned earlier, there is no such thing as true silence. Suddenly dropping the volume will ALWAYS result in a jarring 'pop' occurring in the middle of a sound, even if it's hushed.
It is always good practice to use fades in every situation.
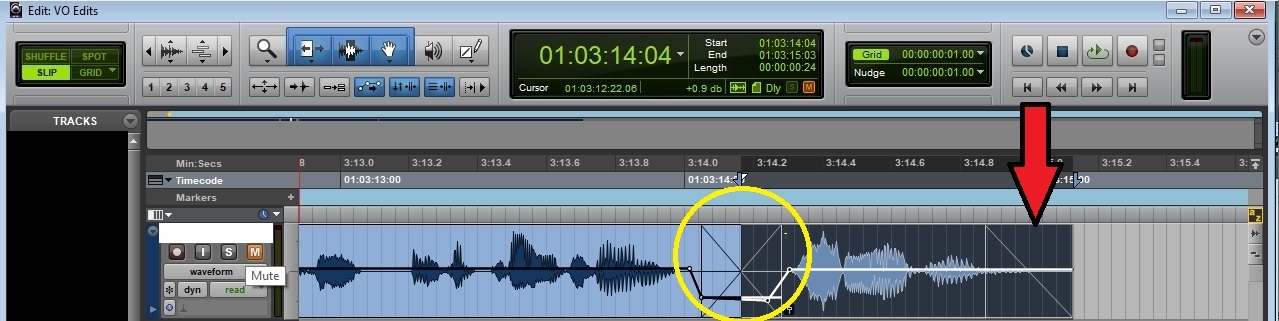
This is an example of another type of fade. The section inside the yellow circle is called a crossfade.
The reason for using a crossfade in this example, rather than using the volume automation I mentioned in tip 2, is because we're placing two separate audio files next to each other. We could be doing this for several reasons, but it's usually to remove a long gap, cut in an alternate take of a specific line, or remove mistakes and unpleasant noises.
The advantage of the crossfade is that it fades out at the end of the first audio file while simultaneously fading at the start of the next one, thus ensuring a seamless blend. Crossfades are essential if the quality of the background noise changes slightly or if there is a rustle or breath near the start of the following line.
Just bumping two audio tracks together and not using a crossfade will always lead to an audible 'pop' sound.
If you blow up the size of the waveform to an enormous size, you will see a sudden disruption in the sound wave. The sound wave should be one continuous line. When you slam a new waveform up against it, the fluidity will be interrupted, and it will sound more like a square wave, which is not a sound you hear in nature.
If you're making sick electronic music, that's probably ok, but probably not so good for the natural voice.
The section with the red arrow pointing at it is half of a crossfade—a simple fade out. It's for similar reasons to using a crossfade: to prevent a 'pop' when the waveform suddenly stops.
ALSO READ: 5 Tips For Perfect Microphone Technique
6. EDIT PLOSIVES AND ESSES MANUALLY
The reasoning for this is similar to de-breathing, especially for ‘S’ sounds and other sorts of hiss.
When you have a sharp sibilant, it is best to follow the same process as reducing the levels of breaths—don’t reduce it too much, and ensure there is a fade in and fade out to the surrounding audio.
Sometimes, a very moderate EQ cut around the high frequencies can help reduce overall sibilance, but don’t overdo it! Humans perceive a 12dB reduction as a 50% reduction in the volume. If all of your esses are half as loud as the rest of the audio because you radically cut 7-10kHz from your entire recording, it’s going to sound downright weird.
Also, remember that EQ will affect the entire audio track. Every natural sound has a fundamental frequency, with harmonics that are higher frequencies ‘above’ it. While the frequency that you have EQ’d out may be the ‘base’ frequency of the ‘S’ that you are trying to reduce, it could be a critical harmonic to add clarity to other sounds. It’s much better to go through and reduce the level of esses first manually and apply EQ on either a very delicate overall basis or preferably an individual basis. Only do this if it is an incredibly piercing sound. Generally, reducing the level is best. A general rule of thumb is:
- If there is sibilance all the way through and not just on the ‘S’ sounds in words, apply a light EQ cut at the appropriate frequency.
- If the sibilance is only on the ‘S sounds in words, go through and manually reduce the volume level of the esses.
Another similar type of sound that needs specific manual editing are plosives, which generally the letter ‘P’ and sometimes ‘B’ or ‘D’.
‘T’ is technically a sibilant, and won’t be edited the same way as plosives – treat ‘T’ like an ‘S’
It’s easier to show what an edited plosive ‘looks like’ in Pro-Tools with another screenshot:
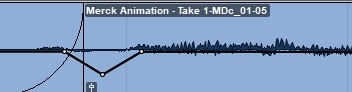
Above is what an edited plosive looks like in Pro-Tools, with another screenshot. See? Easy! I will explain what is happening here. The fade-in at the start is the key to editing a plosive. More often than not, that is all that's needed.
When you say a 'P' sound, you expel a small puff of air, which is why you should use a pop shield to prevent most of this air from hitting the microphone.
However, not every 'P' is trapped by the pop-shield, and the audio will still require some editing. Fading in any syllable will generally sound quite unnatural. If you compare the image above with the photos of fades earlier in this article, you will see that the fade-in for the plosive is much steeper and faster than crossfades and other fades.
The above image is zoomed in quite far, so the fade is just a matter of milliseconds long here. The minor adjustment is because you still want to keep the essence of the plosive, so it recognisably sounds like a 'P', but just very quickly and gently remove the puff of air at the start. It's very easy to over-edit plosives this way, so follow the general rule:
keep the fade in extremely short.
If it starts to sound like a 'B' or sometimes even an 'E', you've gone too far, and you should leave it alone entirely. The second part of this edit is a tiny slight dip in volume after the fade-in.
If you look at the clip gain line (the black line across the middle of the waveform), you will see this small piece of volume automation. Some plosives have a low frequency 'raspberry' sounding noise after the initial puff of air. Rather than cutting it out (and using a crossfade, as mentioned earlier!), it is best to slightly dip the volume of these unpleasant sounds, taking care to keep the slope in and out gentle. The principles of good audio editing all overlap!
7. GET YOUR MIC TECHNIQUE AND SETUP RIGHT
Solid mic technique is vital—record it right in the first place, and you won’t have to do any editing at all.
- Ensure you have a microphone that sounds good for your voice, and you won’t need to EQ.
- Turn down the gain on your interface, project your voice, and get a nice quiet room, and you won’t have to use any noise reduction plug-ins.
- Practice your microphone technique and vocal control, and you won’t have to compress or use volume automation on your recording.
- Get your breath control nice and quiet, and you won’t need to edit them at all.
- If you ensure you do as many takes as it needs until you get one perfect take, you won’t need to mask any edits with room tone or use crossfades to join edits together.
- Get a decent pop shield and stand further away from your microphone, and you won’t need to worry about editing plosives.
- Drink plenty of water and train your voice well, and you won’t need even to reduce esses!
TOP RECORDING TIP: Everybody makes mistakes in a recording, particularly in long-form context like audiobooks. It can be a pain listening through the WHOLE thing to remove mistakes. A quick and easy solution to this is to either clap, or even use a dog training clicker, to indicate when you have made a mistake! This will show up as a sharp 'peak' on the waveform when you are editing your audio, so you can edit entirely visually and not need to listen to that particular bit at all. This enormously speeds things up!
The best cure is prevention. This will make things easier when working on the audio or video edit stage. If you do need to edit, following these basic tips (numbers 4 and 5 are probably the absolute most important ones!) and your clients and audio engineers should be having a great time working with you!


More from this author


Sometimes we include links to online retail stores such as Amazon. As an Amazon Associate, if you click on a link and make a
purchase, we may receive a small commission at no additional cost to you.